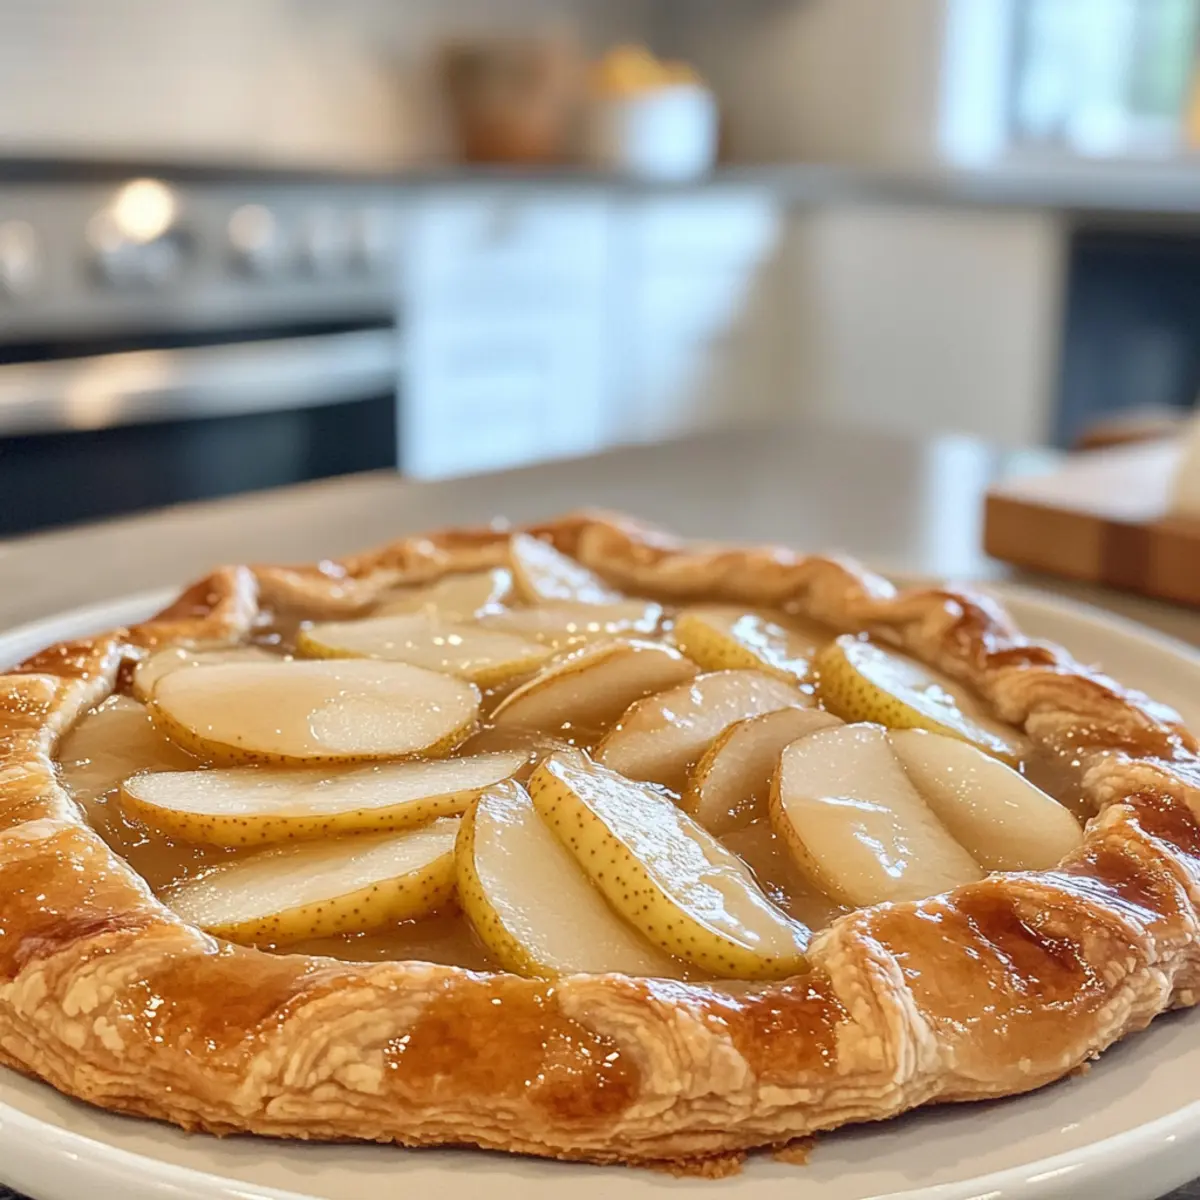
As the air turns crisp and the leaves begin to dance in vibrant hues, my thoughts inevitably drift to cozy gatherings and the scents of fall wafting through the kitchen. Imagine the delightful aroma of warm pears mingling with the spicy kick of ginger as you prepare this rustic Pear Galette. It’s one of those simple yet elegant desserts that not only fills the belly but warms the heart too—a perfect addition to your Thanksgiving table.
This charming galette is wonderfully versatile, allowing you to customize the fruits or spices according to your taste. Whether you’re using juicy pears, sweet apples, or even a medley of berries, each bite promises a burst of flavor cradled within a buttery, flaky crust. Plus, it’s surprisingly easy to whip up, making it the ideal antidote to those boring fast-food nights. Get ready to impress your friends and family without spending hours in the kitchen; this recipe is as delightful to make as it is to share!
Why is this Pear Galette so special?
Simplicity at its finest: The easy-to-follow steps make baking a delight for both novice cooks and seasoned chefs alike.
Warm, Inviting Aroma: Your kitchen will be filled with the comforting scent of fresh pears and spicy ginger, igniting the cozy spirit of fall.
Customizable with ease: Swap in your favorite fruits or spices, ensuring every galette feels unique and tailored to your palate.
Perfect for Gatherings: This stunning dessert is guaranteed to be a crowd-pleaser at Thanksgiving or any cozy gathering.
Quick Prep Time: With just a little patience during the chilling phase, you’ll have a delectable dessert ready in under an hour!
Deliciously Rustic: Its charming, laid-back presentation adds warmth and a personal touch to your dining experience.
Pear Galette Ingredients
• For those ready to create magic in their kitchen, here’s what you need!
For the Filling
- 3 cups fresh pears – Provides natural sweetness and juiciness; substituting with apples, peaches, or berries works beautifully.
- 1/2 cup granulated sugar – Sweetens the filling; adjust based on the fruit’s sweetness for the perfect balance.
- 1 teaspoon ground ginger – Adds warmth and spice; you can swap for cinnamon or nutmeg for a delightful twist.
For the Crust
- 1 1/4 cups all-purpose flour – Acts as the base for a flaky crust; choose a gluten-free blend if needed.
- 8 tablespoons unsalted cold butter, cubed – Ensures a deliciously flaky texture; margarine can be used for a dairy-free option.
- 1/4 teaspoon salt – Enhances flavor; no substitutions are needed here.
- 3 to 4 tablespoons ice water – Helps bring the dough together; use just enough to avoid over-hydrating.
This Pear Galette promises to be a hit, so gather your ingredients and let’s make something truly delightful!
How to Make Pear Galette
- Prepare the Dough: In a medium bowl, whisk together the flour and salt. Cut in the cold butter until the mixture resembles coarse crumbs. Gradually add ice water, mixing until the dough forms. Wrap in plastic and chill in the fridge for at least 1 hour.
- Preheat the Oven: While your dough is chilling, set the oven to 400°F (200°C). This will ensure it’s perfectly hot for baking your galette.
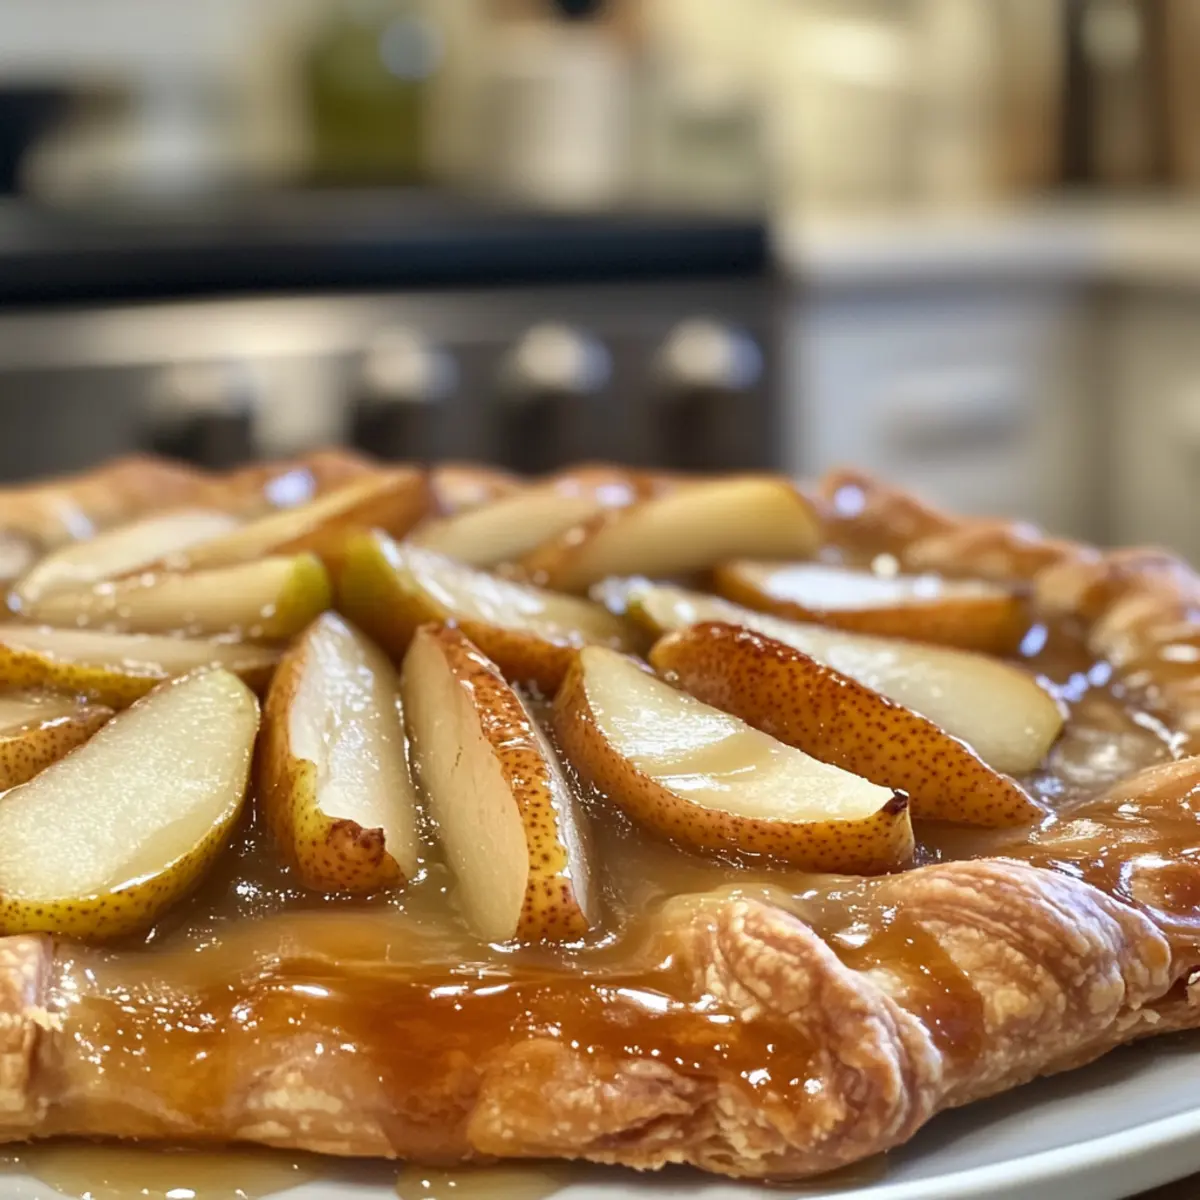
- Slice the Pears: Peel, core, and thinly slice the fresh pears. This helps them bake tenderly and release their sweet juices throughout the galette.
- Assemble the Galette: On a piece of parchment paper, roll out the chilled dough into a rough 12-inch circle. Place the sliced pears in the center, leaving a 2-inch border. Sprinkle them with sugar and ginger to enhance their flavor.
- Fold the Edges: Gently fold the dough edges over the pears towards the center, creating a rustic look by overlapping slightly. This will cradle the filling beautifully.
- Bake: Transfer the galette on the parchment to a baking sheet. Bake for 30-35 minutes until the crust is golden brown and the pears are tender. Let cool slightly before slicing and serving to allow the flavors to meld.
Optional: Serve warm for a delightful treat, topped with vanilla ice cream or whipped cream.
Exact quantities are listed in the recipe card below.

Storage Tips for Pear Galette
Fridge: Store leftover Pear Galette in an airtight container for up to 3 days. Let it cool completely before sealing to maintain its flaky texture.
Freezer: Wrap slices tightly in plastic wrap, then place them in a freezer-safe container. They’ll keep well for up to 2 months, preserving the delightful flavors.
Reheating: To enjoy your galette again, preheat the oven to 350°F (175°C). Place slices on a baking sheet and heat for about 10 minutes until warmed through.
Room Temperature: If serving the galette on the same day, you can leave it out at room temperature for up to 2 hours before slicing to ensure it remains fresh and inviting.
What to Serve with Pear Galette with Ginger?
Elevate your cozy gatherings with delightful accompaniments to this rustic dessert that will turn heads and taste buds.
- Vanilla Ice Cream: The creamy, cool texture beautifully contrasts the warm galette, enhancing the ginger spice and sweet pear flavors. A scoop of ice cream brings a luxurious touch to your dessert experience.
- Whipped Cream: Light and fluffy, whipped cream adds a delicate sweetness that complements the rich, buttery galette. You can even infuse it with vanilla or a hint of nutmeg for a festive twist.
- Spiced Apple Cider: A warm cup of spiced apple cider echoes autumnal flavors, making it perfect for cozy evenings. The warmth from the cider pairs wonderfully with the warm, spicy notes of the galette.
- Fresh Berries: A side of fresh berries, such as raspberries or blueberries, adds a burst of tartness and contrasting texture. They brighten the dessert presentation and refresh your palate between bites.
- Caramel Sauce: Drizzling warm caramel over your slice creates a sweet, gooey richness that enhances the flavors of the pear and ginger. It’s a decadent addition that transforms your galette into a striking centerpiece.
- Nutty Granola: For a delightful crunch, sprinkle some nutty granola on top. The combination of oats, nuts, and a hint of sweetness adds an unexpected twist that complements the softness of the galette.
- Moscato Wine: A chilled glass of Moscato offers a light, fruity sweetness that pairs beautifully with the spiced pear filling. This sparkling wine adds a celebratory feel to your gathering.
These pairing ideas promise to turn your simple dessert into an unforgettable feast, perfect for any occasion!
Pear Galette Variations
Customize your Pear Galette to create a unique, delightful dessert that you and your loved ones will adore.
- Apple Twist: Substitute pears with tart apples for a refreshing and slightly tangy flavor. It creates a fabulous contrast with the sweetness.
- Berry Bliss: Swap in mixed berries like blueberries or raspberries for a pop of color and added sweetness. This fruity twist captures the essence of a summer garden.
- Gluten-Free: Use a gluten-free flour blend in place of all-purpose flour, making it suitable for those with gluten sensitivities while maintaining a delicious texture.
- Nutty Crunch: Sprinkle chopped nuts like almonds or walnuts atop the galette before baking for an added crunch and depth of flavor. The nutty essence complements the sweet pears beautifully.
- Spicy Kick: Swap ground ginger for cayenne pepper or add a pinch of black pepper for an unexpected heat. This balance enhances the flavor profile, giving your galette a little sass.
- Citrus Zing: Incorporate a teaspoon of lemon or orange zest into the pear filling for a bright, zesty flavor that balances the sweetness wonderfully.
- Caramel Drizzle: After baking, drizzle with caramel sauce for decadent sweetness. This gooey addition elevates your dessert, making it irresistibly indulgent.
- Dairy-Free Option: Replace butter with coconut oil or a plant-based butter substitute for a dairy-free crust that’s just as flaky and delightful. It adds a subtle coconut flavor that complements the fruit beautifully.
Make Ahead Options
These Pear Galette prep options are perfect for busy home cooks looking to save time without sacrificing flavor! You can prepare the dough up to 24 hours in advance; simply wrap it tightly in plastic and refrigerate. The pears can also be sliced and tossed with sugar and ginger, then stored in an airtight container in the fridge for up to 3 days. This way, they stay fresh and ready to use. When you’re ready to bake, roll out the chilled dough, assemble the galette with the prepared pears, and follow the baking instructions. This method allows you to enjoy a delightful dessert with minimal last-minute effort, keeping it just as delicious as if made fresh!
Expert Tips for Perfect Pear Galette
- Chill Your Tools: For the flakiest crust, make sure your butter and even mixing tools are chilled beforehand. It helps keep the fat solid while baking.
- Fruit Variety: Feel free to swap pears for apples or berries, but remember to adjust the sugar depending on the sweetness of the fruit used in your Pear Galette.
- Watch the Crust: Avoid overbaking; keep an eye on it, as every oven is different. You want a golden-brown crust but not a burnt one!
- Slicing Technique: Thinly slicing your pears ensures even cooking; larger chunks may result in undercooked sections or uneven texture.
- Save for Later: If there are leftovers, store them properly in an airtight container. They can be kept in the fridge for up to three days, then reheated gently for a cozy treat.
Pear Galette with Ginger Recipe FAQs
How do I select the best pears for my galette?
Absolutely! When choosing pears, look for ones that are slightly firm to the touch but yield slightly when pressed. Avoid those with dark spots or bruising. Bosc or Anjou pears are fantastic options due to their sweetness and ability to hold their shape during baking.
How should I store leftover Pear Galette?
Leftover Pear Galette can be stored in an airtight container in the fridge for up to 3 days. It’s best to let it cool completely before sealing to maintain that flaky texture. When you’re ready to enjoy it again, just pop it in the oven at 350°F (175°C) for about 10 minutes for a warm treat!
Can I freeze my Pear Galette?
Very! To freeze your Pear Galette, wrap slices tightly in plastic wrap, then place them in a freezer-safe container or a zip-lock bag. This method will keep it fresh for up to 2 months. When you’re ready to savor the galette, just thaw it overnight in the fridge and reheat as mentioned earlier.
What if my galette crust is too tough?
If you find your crust has turned out tough, it may be due to overworking the dough or not enough fat. Make sure to handle the dough gently and keep your butter cold before mixing. For a lighter texture next time, consider using less flour and adding an extra tablespoon of ice water to help create a more tender crust.
Are there any dietary considerations for my guests?
Absolutely! This Pear Galette can be made gluten-free by substituting regular flour with a gluten-free flour blend. If you have guests with dairy allergies, simply use margarine instead of butter, and you’re good to go. Always remember to ask about any other dietary restrictions or allergies when preparing your ingredients.
Can I make this recipe ahead of time?
Yes! You can prepare the dough in advance and store it wrapped in plastic in the fridge for up to 2 days. If you prefer, you can also roll out the dough and freeze it, then simply thaw before you fill and bake. That way, you’ll have a fresh dessert ready to go when hosting gatherings!

Heavenly Easy Pear Galette with Ginger for Cozy Nights
Equipment
- Mixing bowl
- Oven
- Rolling Pin
- Baking Sheet
- Parchment Paper
Ingredients
For the Filling
- 3 cups fresh pears Provides natural sweetness and juiciness; substituting with apples, peaches, or berries works beautifully.
- 1/2 cup granulated sugar Sweetens the filling; adjust based on the fruit's sweetness for the perfect balance.
- 1 teaspoon ground ginger Adds warmth and spice; you can swap for cinnamon or nutmeg for a delightful twist.
For the Crust
- 1 1/4 cups all-purpose flour Acts as the base for a flaky crust; choose a gluten-free blend if needed.
- 8 tablespoons unsalted cold butter, cubed Ensures a deliciously flaky texture; margarine can be used for a dairy-free option.
- 1/4 teaspoon salt Enhances flavor; no substitutions are needed here.
- 3 to 4 tablespoons ice water Helps bring the dough together; use just enough to avoid over-hydrating.
Instructions
How to Make Pear Galette
- In a medium bowl, whisk together the flour and salt. Cut in the cold butter until the mixture resembles coarse crumbs. Gradually add ice water, mixing until the dough forms. Wrap in plastic and chill in the fridge for at least 1 hour.
- While your dough is chilling, set the oven to 400°F (200°C). This will ensure it’s perfectly hot for baking your galette.
- Peel, core, and thinly slice the fresh pears. This helps them bake tenderly and release their sweet juices throughout the galette.
- On a piece of parchment paper, roll out the chilled dough into a rough 12-inch circle. Place the sliced pears in the center, leaving a 2-inch border. Sprinkle them with sugar and ginger to enhance their flavor.
- Gently fold the dough edges over the pears towards the center, creating a rustic look by overlapping slightly.
- Transfer the galette on the parchment to a baking sheet. Bake for 30-35 minutes until the crust is golden brown and the pears are tender. Let cool slightly before slicing and serving.
Notes
Nutrition


Leave a Comment