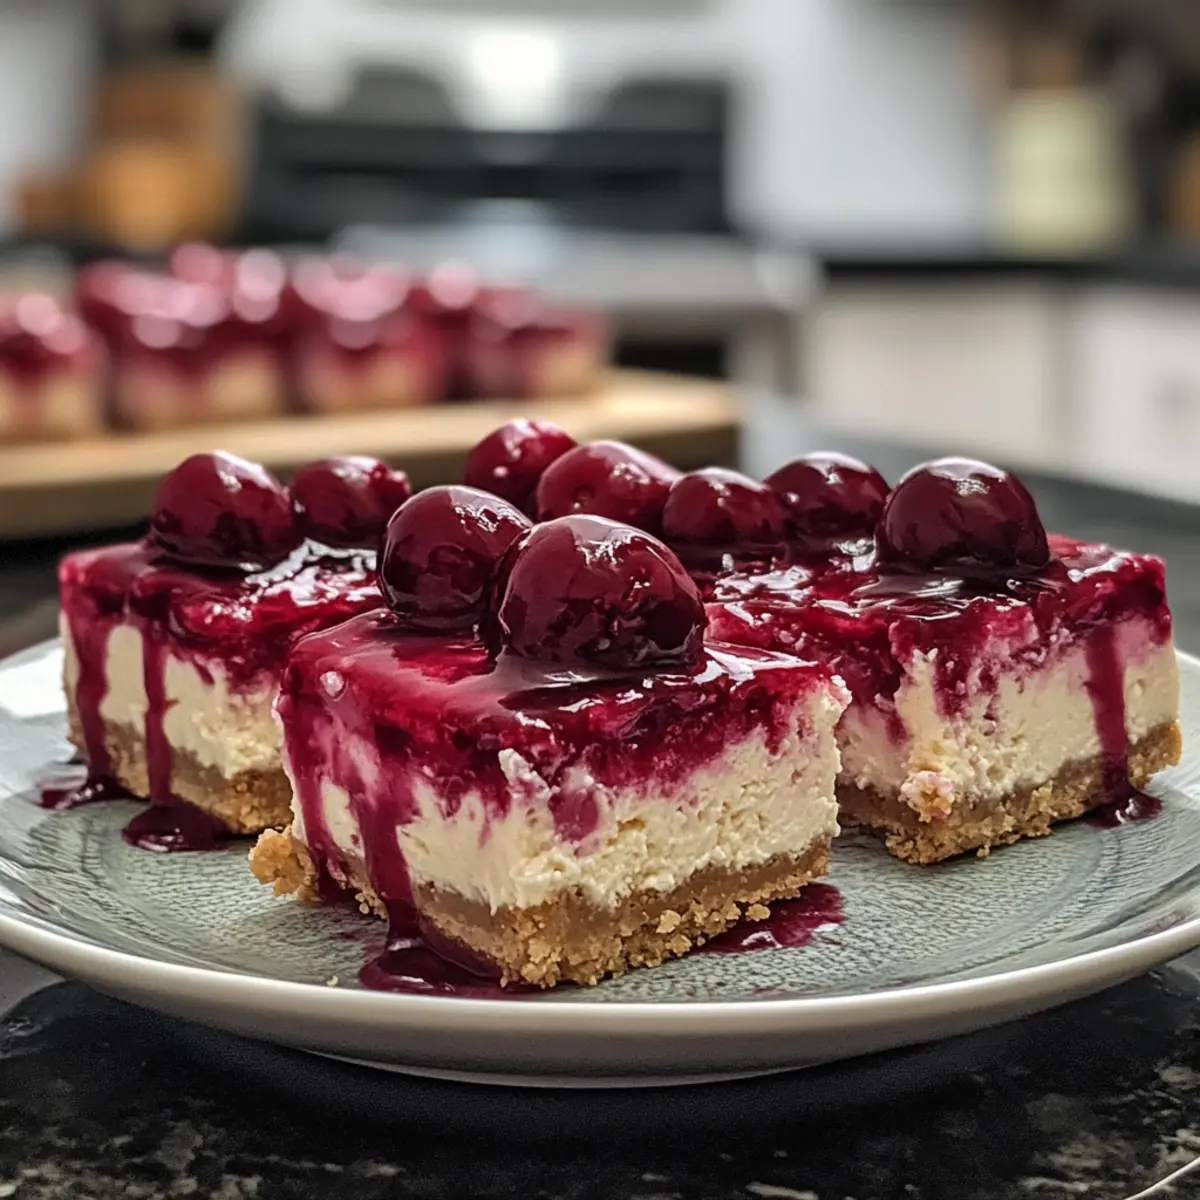
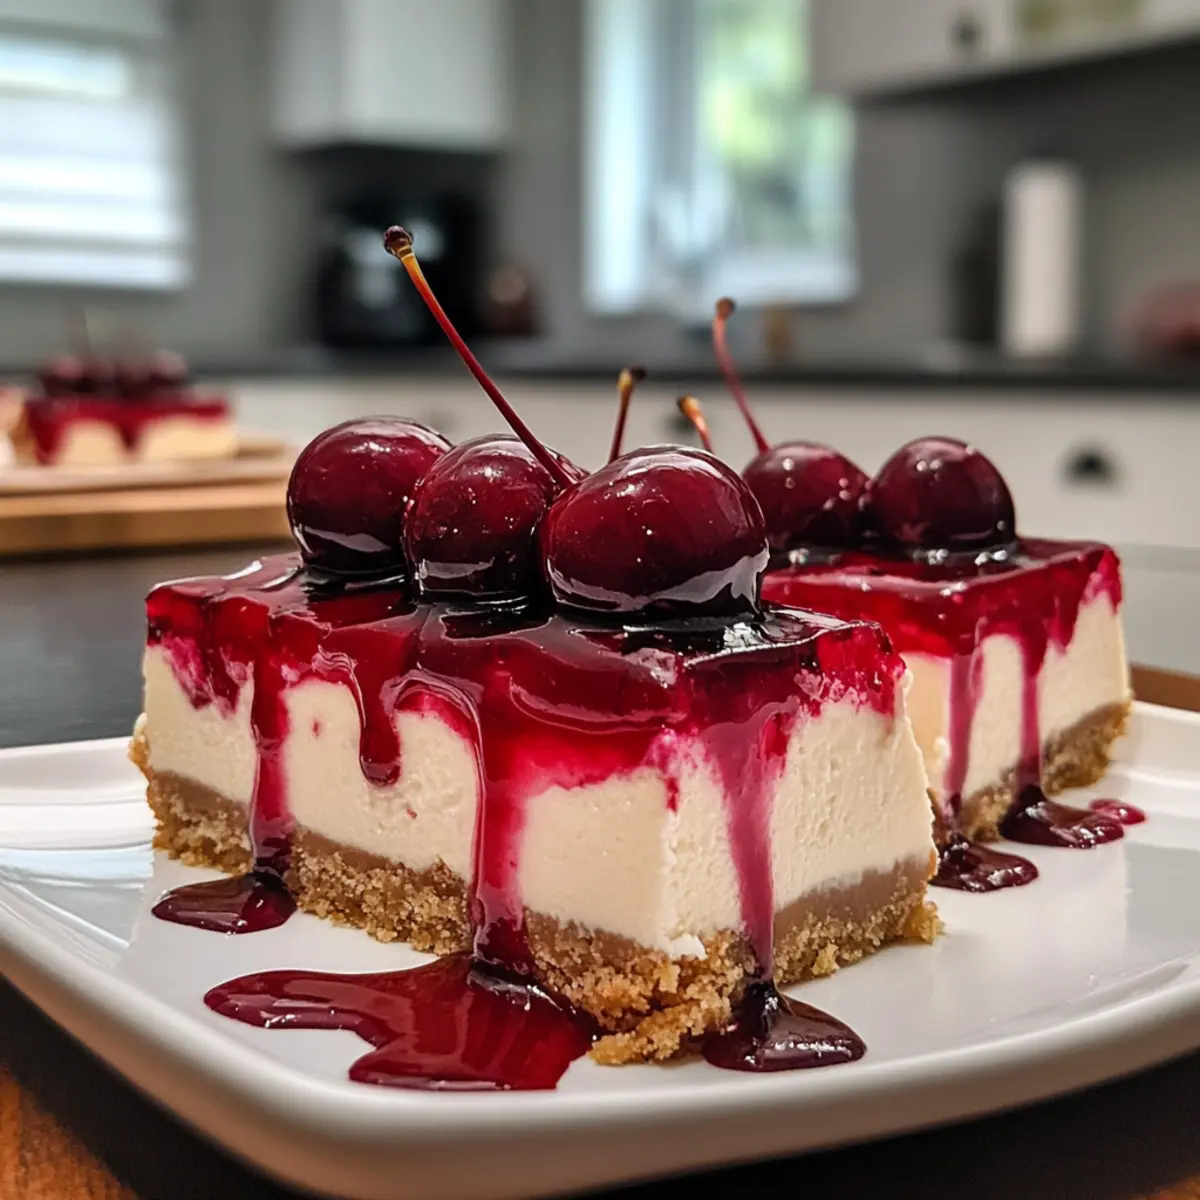
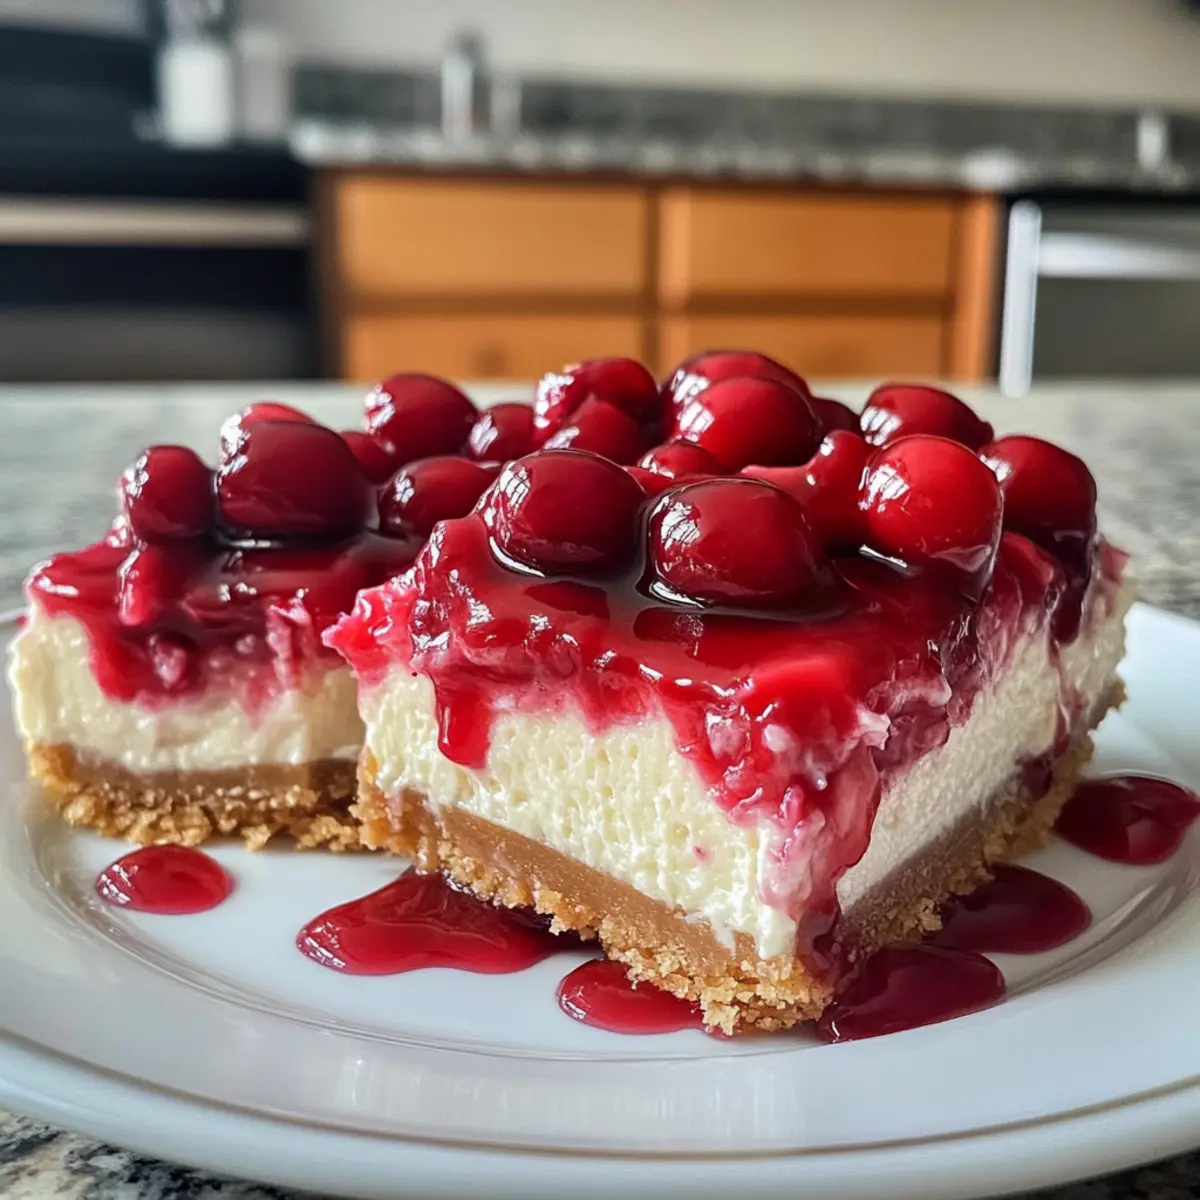
When the summer sun starts to warm up the air, there’s a certain magic that happens in the kitchen. The vibrant colors of fresh cherries inspire creativity, and suddenly, a craving for something sweet strikes. Enter my Creamy Cherry Cheesecake Bars—the perfect answer to that sweet tooth. These delightful squares combine a silky cheesecake filling with a luscious cherry topping, all sitting atop a buttery graham cracker crust that gives each bite just the right amount of crunch. They are incredibly easy to whip up, making them perfect for gatherings, picnics, or simply as a treat for yourself after a long day. The best part? You can customize them using either cherry pie filling or fresh, pitted cherries, allowing you to make this dessert truly your own. Trust me, once you cut into these bars and see the layers—a creamy dream topped with a burst of fruity goodness—you’ll find them hard to resist!
Why You’ll Love These Creamy Cherry Cheesecake Bars
Simplicity at its Finest: This recipe requires minimal effort and uses common ingredients, making it a breeze for anyone to create.
Rich, Creamy Texture: The combination of cream cheese and sour cream gives these bars a decadent creaminess you’ll crave.
Versatile Topping Options: Whether you prefer cherry pie filling or fresh cherries, you can customize the flavor and presentation to your liking.
Perfect for Any Occasion: These bars are a showstopper at picnics, potlucks, or even just family dessert night; everyone will be asking for seconds!
Make-Ahead Friendly: Save time by preparing these Creamy Cherry Cheesecake Bars a day in advance; they store beautifully in the fridge!
Impressive yet Easy: The layered look of these bars impresses guests while keeping the preparation simple, so you can enjoy the moment without stress.
Creamy Cherry Cheesecake Bars Ingredients
For the Crust
- Graham Crackers – Provides structure and a crunchy base; substitute with gluten-free graham crackers for a gluten-free option.
- Granulated Sugar (Crust) – Sweetens the crust; can reduce sugar for less sweetness if desired.
- Unsalted Butter – Binds graham cracker crumbs; substitute with coconut oil for a dairy-free option.
For the Filling
- Cream Cheese – Core ingredient for the filling, providing creaminess and texture; must be softened for easy mixing.
- Granulated Sugar (Filling) – Sweetens the cheesecake; alternative sweeteners like erythritol can be used for a lower-calorie version.
- Vanilla Extract – Adds flavor depth; substitute with almond extract for a different flavor profile.
- Large Eggs – Provides structure and helps set the cheesecake; no substitutes recommended.
- Sour Cream – Offers a tangy flavor and creaminess; Greek yogurt can serve as a lower-fat alternative.
For the Topping
- Cherry Pie Filling – Topping that adds sweetness and fruitiness, making these Creamy Cherry Cheesecake Bars delightful; fresh cherries (pitted and halved) can be used for a fresher option.
- Fresh Cherries – Optional garnish for extra visual appeal and a burst of freshness.
How to Make Creamy Cherry Cheesecake Bars
-
Preheat the oven to 325°F (160°C). This prepares your kitchen for baking, helping to ensure an even bake for your lovely cheesecake bars.
-
Grease a 9×13-inch baking dish or line it with parchment paper. This step is essential for easy removal of your dessert once it’s baked!
-
Combine graham cracker crumbs, sugar, and melted butter in a bowl. Mix until the crumbs are evenly coated, forming a sandy texture that will hold together beautifully.
-
Press the crumb mixture into the bottom of your prepared pan. Use the back of a measuring cup or your fingers to create an even layer, ensuring a solid base for your bars.
-
Bake the crust for about 10 minutes, or until it turns lightly golden. Allow it to cool slightly before you add the cheesecake filling, which helps create a perfect texture.
-
Beat softened cream cheese in a mixing bowl until smooth and creamy. This creates the luscious base for your filling—make sure there are no lumps!
-
Gradually mix in the sugar and vanilla extract until everything is well combined. You want a beautiful, sweet mixture that will add depth to each bite.
-
Add large eggs one at a time, mixing well after each addition. This helps bind everything together and ensures a rich and creamy filling.
-
Fold in the sour cream gently; this adds tanginess and creaminess to your filling. Make sure it’s well blended for the best flavor!
-
Pour the cheesecake filling over the cooled crust, spreading it evenly with a spatula. This is where the magic happens, so take your time to smooth it out!
-
Bake for 25-30 minutes until the edges are set, and the center jiggles slightly. You want it to have that perfect creamy consistency!
-
Cool at room temperature for 30 minutes, then refrigerate for at least 2 hours to set. This chilling time is vital for slicing nice, clean bars.
-
Spread cherry pie filling over the top of the cooled cheesecake. Optionally, garnish with fresh cherries for an extra touch of beauty!
-
Cut into squares or bars and serve chilled. You’ll find them irresistible—enjoy!
Optional: Serve with a dollop of whipped cream for an extra indulgent treat.
Exact quantities are listed in the recipe card below.
Creamy Cherry Cheesecake Bars Variations
Embrace your creativity and make these bars your own with delightful twists and substitutions!
-
Gluten-Free Crust: Use gluten-free graham crackers instead of regular ones for an equally delicious base. Everyone can indulge guilt-free!
-
Dairy-Free Option: Swap unsalted butter for coconut oil and use dairy-free cream cheese to cater to lactose sensitivities. Rich and creamy goodness without the dairy!
-
Lower-Calorie Sweetener: Replace granulated sugar with erythritol or another low-calorie sweetener in the filling for a lighter version. Enjoy the sweetness without the extra calories!
-
Alternative Fruit Toppings: Experiment with blueberry or strawberry pie filling for a tasty change of pace. A fruity twist keeps it fresh and exciting!
-
Flavored Cream Cheese: Try using flavored cream cheese like chocolate or strawberry for a fun, decadent twist. The unique flavors will elevate your cheesecake experience!
-
Nutty Crust Addition: Mix in chopped nuts like walnuts or pecans with the graham cracker crust for added crunch and flavor. A delightful surprise in each bite!
-
Chilled Dessert Bars: For a cool summer treat, freeze these bars for a couple of hours before serving, offering a refreshing twist. Perfect for those hot days!
-
Zesty Citrus Twist: Add the zest of a lemon or orange to the filling for a bright, zesty flavor that pairs beautifully with the cherries. A hint of citrus makes everything pop!
Storage Tips for Creamy Cherry Cheesecake Bars
- Fridge: Store leftover bars in an airtight container for up to 5 days; this keeps them fresh and maintains their creamy texture, so you can enjoy them later.
- Freezer: For longer storage, freeze the bars wrapped tightly in plastic wrap and then foil for up to 2 months; just thaw in the fridge overnight before serving.
- Reheating: Though best served chilled, if you prefer a warm treat, briefly warm individual bars in the microwave for about 10-15 seconds.
What to Serve with Creamy Cherry Cheesecake Bars?
When you’re ready to create a delightful dessert experience, these bars need the perfect companions to shine even brighter!
-
Whipped Cream: A dollop of airy whipped cream adds a light, creamy contrast that elevates the rich cheesecake flavors.
-
Vanilla Ice Cream: The creamy goodness of vanilla ice cream pairs beautifully with the tart cherries and adds a comforting touch.
-
Fresh Berries: A mix of strawberries, blueberries, or raspberries adds a refreshing burst of flavor and a touch of color to your dessert spread.
-
Chocolate Drizzle: A rich chocolate sauce drizzled on top creates a decadent twist that perfectly complements the sweet and tart cherry notes.
-
Coffee or Espresso: The bold, roasted flavors of coffee bring balance to the sweetness, making each bite of cheesecake even more satisfying.
-
Sparkling Water with Lime: Refreshing sparkling water garnished with a hint of lime provides a crisp contrast, cleansing the palate between bites.
Consider offering these delightful pairings to create a vibrant dessert spread that will entice and please everyone around the table!
Make Ahead Options
These Creamy Cherry Cheesecake Bars are a fantastic option for meal prep, saving you time for those busy days! You can prepare the crust and filling up to 24 hours in advance; just store each component separately in airtight containers in the refrigerator to maintain freshness. Once you’re ready to serve, pour the filling over the cooled crust and bake as directed. After the bars have cooled and set, top them with cherry pie filling and fresh cherries, allowing the flavors to meld beautifully overnight. This way, you’ll have a delicious dessert ready to impress your guests with minimal effort!
Expert Tips for Creamy Cherry Cheesecake Bars
-
Room Temperature Cheese: Ensure your cream cheese is at room temperature before mixing to achieve a smooth, lump-free filling that blends beautifully.
-
Don’t Overmix: When adding the eggs, mix just until incorporated; overmixing can introduce air, causing the cheesecake to crack while baking.
-
Cool Before Topping: Let your cheesecake cool fully before adding cherry topping. This prevents the cherries from sinking and maintains a lovely texture.
-
Mind the Baking Time: Avoid over-baking—you’re aiming for the edges to be set and the center slightly jiggly, as these Creamy Cherry Cheesecake Bars will firm up during chilling.
-
Chill for Clean Slices: For perfect, clean slices, chill the bars for at least 2 hours before cutting. The waiting time is worth it!
Creamy Cherry Cheesecake Bars Recipe FAQs
What cherries should I use for the topping?
Absolutely! You can use either cherry pie filling for a sweeter, more luxurious topping, or fresh cherries for a lighter, less sweet option. If using fresh cherries, make sure they are pitted and halved for a beautiful presentation and easy serving.
How should I store the leftover cheesecake bars?
Very! Store your leftover Creamy Cherry Cheesecake Bars in an airtight container in the refrigerator for up to 5 days. This helps keep them fresh and maintains that delicious creamy texture you love.
Can I freeze these cheesecake bars?
Of course! To freeze, wrap the bars tightly in plastic wrap, then in aluminum foil to prevent freezer burn. They can be frozen for up to 2 months. When you’re ready to enjoy them, simply thaw them in the refrigerator overnight before serving.
What should I do if my cheesecake cracks while baking?
No worries! If you find that your cheesecake has cracked, it could be due to overmixing or baking too long. To prevent this, mix just until combined and avoid overbaking. If it does crack, don’t stress—top it off with extra cherry filling to cover it up; no one will ever know!
Are there any allergy considerations with the ingredients?
Great question! The primary allergens here include dairy (from cream cheese, butter, and sour cream) and gluten (from graham crackers). For a gluten-free version, use gluten-free graham crackers, and for a dairy-free option, you can substitute with dairy-free cream cheese and coconut oil. Always check for any specific allergies before serving.

Irresistibly Creamy Cherry Cheesecake Bars You'll Love
Equipment
- 9x13-inch baking dish
- Mixing bowl
- Spatula
Ingredients
For the Crust
- 1 cup Graham Crackers substitute with gluten-free graham crackers for a gluten-free option
- 1/4 cup Granulated Sugar can reduce sugar for less sweetness if desired
- 1/2 cup Unsalted Butter substitute with coconut oil for a dairy-free option
For the Filling
- 16 oz Cream Cheese must be softened for easy mixing
- 1/2 cup Granulated Sugar alternative sweeteners like erythritol can be used for a lower-calorie version
- 1 tsp Vanilla Extract substitute with almond extract for a different flavor profile
- 3 large Large Eggs no substitutes recommended
- 1/2 cup Sour Cream Greek yogurt can serve as a lower-fat alternative
For the Topping
- 1 can Cherry Pie Filling fresh cherries (pitted and halved) can be used for a fresher option
- 1 cup Fresh Cherries optional garnish for extra visual appeal and freshness
Instructions
How to Make
- Preheat the oven to 325°F (160°C).
- Grease a 9x13-inch baking dish or line it with parchment paper.
- Combine graham cracker crumbs, sugar, and melted butter in a bowl. Mix until the crumbs are evenly coated.
- Press the crumb mixture into the bottom of your prepared pan.
- Bake the crust for about 10 minutes, or until it turns lightly golden.
- Beat softened cream cheese in a mixing bowl until smooth and creamy.
- Gradually mix in the sugar and vanilla extract until well combined.
- Add large eggs one at a time, mixing well after each addition.
- Fold in the sour cream gently.
- Pour the cheesecake filling over the cooled crust, spreading it evenly.
- Bake for 25-30 minutes until the edges are set, and the center jiggles slightly.
- Cool at room temperature for 30 minutes, then refrigerate for at least 2 hours.
- Spread cherry pie filling over the top of the cooled cheesecake and garnish with fresh cherries.
- Cut into squares or bars and serve chilled.
Leave a Comment